A Domain Name System server (DNS server) plays a crucial role in mapping the hostname of a network device to its corresponding IP address. Typically, computers use the IP address of a device to identify the device in a network. However, IP addresses can be challenging for humans to remember.
DNS helps to associate a recognizable hostname of a device with its IP address. This enables humans to reach the device using its name rather than its numerical IP address.
Here’s a brief overview of how DNS works:
- When a host device attempts to reach a device in the network or a device on the internet, such as “youtube.com,” the host device initiates a DNS request to the DNS server to discover the IP address associated with “youtube.com.”
- The DNS server responds to the host device with the IP address “youtube.com.”
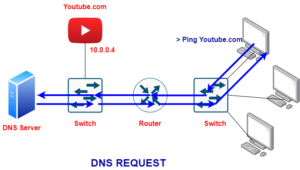
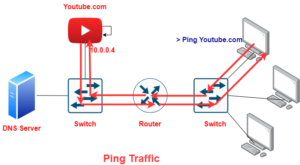
- Subsequently, the host device can directly send packets to “youtube.com” using the IP address obtained from the DNS server.
In this post, I will show you how to configure a DNS server on Cisco Packet Tracer. DNS servers used by host devices can be configured manually or learned using DHCP. In this demonstration, I will show you how to configure a DNS server manually.

Related Post
- How to Configure NTP Server in Packet Tracer
- How to Configure Syslog Server in Packet Tracer
- How to Configure a Web Server in Packet Tracer
- How to Configure TFTP Server In Packet Tracer
- How To Configure FTP Server in Cisco Packet tracer
- How To Configure Email Server in Cisco Packet Tracer
Network Topology
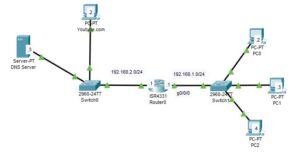
The network topology we will be making use of in this post is shown below. As you can see, it comprises a DNS server, a host device representing Youtube.com, a router, two-layer switches, and other PCs. In this demonstration, we will configure the DNS server to have a record of all the host devices in the network so that all the host devices can be reached using their host names.

How to Configure DNS Server
Here are steps to configure DNS server;
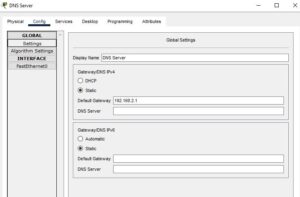
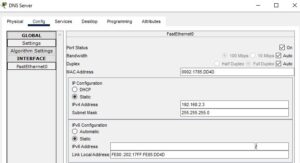
Step 1: Assign IP address to the server
Just like other host devices need an IP address to be identified on a network, the server also needs an IP address to be identified on the network. As labeled in the network diagram, the IP address of the server should be 192.168.2.3, and the default gateway IP address should be 192.168.2.1.
Then Assign IP address to the interface;
Step 2: Add DNS records.
Open the “Services” tab to add the DNS records. To add a record, you need the hostname and the IP address of the network device for which you want to map.
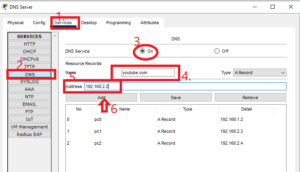
As shown above, I have added an entry to map the IP address 192.168.2.2 to the name “youtube.com” in the DNS record. The steps to do so have been highlighted in the image above.
Follow the above steps to add other records to the DNS server.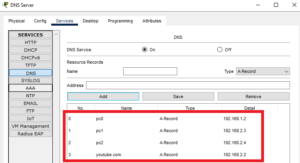
Note: A record is for IPV4 address while AAA record is for IPV6 address
Step 3: Configure the interface of the router
Enter the following commands to assign an IP address to the interfaces of the router as labeled above.
Router>enable
Router#configure terminal
Router(config)#hostname R0
R0(config)#interface g0/0/0
R0(config-if)#ip address 192.168.1.1 255.255.255.0
R0(config-if)#no shutdown
R0(config-if)#interface g0/0/1
R0(config-if)#ip address 192.168.2.1 255.255.255.0
R0(config-if)#no shutdown
Step 4: Configure the host devices
Configure the default gateway and the DNS server on each of the host devices. The default gateway should be the IP address of the interfaces of the router the PC is connected to, and the DNS server IP is the IP address of the DNS server.
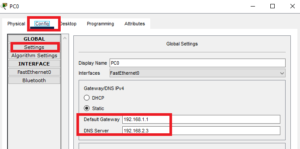
Then configure the fastethernet0 interface of the PC.
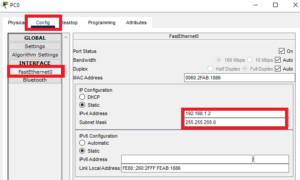
Repeat the above step for each of the hosts in the network.
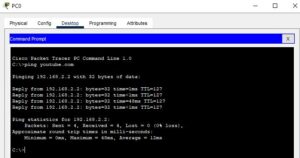
Step 5: Test the configuration
You can confirm that the configuration is working by sending a Ping packet to a host using the hostname configured in the DNS record.
Related Post
- How to Configure NTP Server in Packet Tracer
- How to Configure Syslog Server in Packet Tracer
- How to Configure a Web Server in Packet Tracer
- How to Configure TFTP Server In Packet Tracer
- How To Configure FTP Server in Cisco Packet tracer
- How To Configure Email Server in Cisco Packet Tracer

I am a passionate Networking Associate specializing in Telecommunications.
With a degree in Electronic engineering, I possess a strong understanding of electronic systems and the intricacies of telecommunications networks. I gained practical experience and valuable insights working for a prominent telecommunications company.
Additionally, I hold certifications in networking, which have solidified my expertise in network architecture, protocols, and optimization.
Through my writing skills, I aim to provide accurate and valuable knowledge in the networking field.
Connect with me on social media using the links below for more insights.
You can contact me using [email protected] or connect with me using any of the social media account linked below
