Most network devices are hidden in packet tracer, and sometimes they can be very hard to find, especially if you are trying to use them for the first time. And a firewall is one of them
In this post, I am going to show you How to Add Firewall in Cisco Packet tracer so that you can configure it or do whatever you want with it.
How to Add Firewall in Cisco Packet tracer
Here are steps to add firewall in cisco packet tracer;
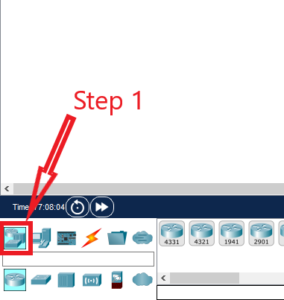
Step 1: Select “Network devices”
After launching the packet tracer software, select “Network devices” from the bottom left hand side of the simulation window.

Step 2: Select “Security”
After selecting network devices, a security icon will appear at the bottom right corner, as shown in the image below. Select it.

![]()
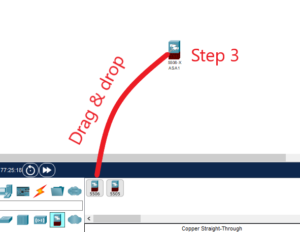
Step 3: Drag and drop the firewall to packet tracer
Once you select “security devices,” two firewall models, “model 5506” and “model 5505”, will be loaded. Drag the one you need and add it to the simulation window.
Step 4: Configure it.
After adding the firewall to the packet tracer, as we have shown you above, you can use a network cable to join it to other network devices and begin your configuration by tapping on it.

I am a passionate Networking Associate specializing in Telecommunications.
With a degree in Electronic engineering, I possess a strong understanding of electronic systems and the intricacies of telecommunications networks. I gained practical experience and valuable insights working for a prominent telecommunications company.
Additionally, I hold certifications in networking, which have solidified my expertise in network architecture, protocols, and optimization.
Through my writing skills, I aim to provide accurate and valuable knowledge in the networking field.
Connect with me on social media using the links below for more insights.
You can contact me using [email protected] or connect with me using any of the social media account linked below
