Trivial File Transfer Protocol (TFTP) is a file transfer protocol utilized for backing up the configuration of a network device to a server or retrieving a configuration from a server to a network device.
Backing up the configuration of a network device to a server is very important, as it helps prevent extended downtime in the event of a network failure.
Trivial File Transfer Protocol (TFTP) is similar to File Transfer Protocol (FTP), but it distinguishes itself by its simplicity and lack of built-in authentication. Before you can manage an FTP server from a client, you will need to be authenticated by providing a username and password; however, you can backup configuration to the TFTP server or retrieve from it without having to be authenticated.
In this post, I will show you how to configure TFTP server in Packet Tracer.

Related Post
- How to Configure NTP Server in Packet Tracer
- How to Configure Syslog Server in Packet Tracer
- How to Configure a Web Server in Packet Tracer
- How To Configure FTP Server in Cisco Packet tracer
- How To Configure Email Server in Cisco Packet Tracer
- How to Configure DNS Server On Cisco Packet Tracer
Network Topology
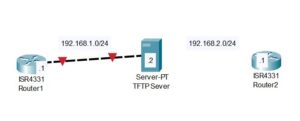
The network topology we will be making use of is shown in the image below. As you can see, it consists of two routers and a TFTP server. In this demonstration, we will make some configuration on router 1, backup the configuration to the TFTP server, and then download the configuration to router 2.

Here is a video on how to configure TFTP Server in packet tracer;
How to Configure TFTP Server In Packet Tracer
Here are steps to configure TFTP Server in packet tracer;
Step 1: Enable TFTP service on the Server
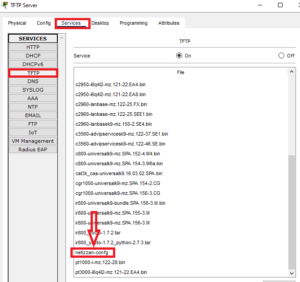
The server we will be making use of in this post is a multipurpose server; it can be used as an FTP server, a DNS server, or even a DHCP server. To use the server as a TFTP server, we need to enable the TFTP service. Though TFTP is enabled by default in server found in packet tracer, we need to confirm that.


Step 2: Configure the Interface IP
We will change the hostname of Router1 from the default to netizzan. We will also configure the IP address of the interface of the router connecting to the server and configure a description of the interface. In the next step, we will backup this configuration to the TFTP server so we will be able to download the configuration on router 2.
Enter the following commands to do this;
Router>enable
Router#configure terminal
Router(config)#hostname netizzan
netizzan(config)#interface g0/0/0
netizzan(config-if)#ip address 192.168.1.1 255.255.255.0
netizzan(config-if)#description "This interface is connected to the server"
netizzan(config-if)#no shutdown
Note: You can make many other configurations depending on your specific needs before moving on to the next step.
Also, remember to assign the IP; 192.168.1.2 to the interface of the TFTP server and 192.168.1.1 as the default gateway IP address.
Step 3: Backup the Configuration
Now that we have completed the configuration on the Cisco router, we can back up the configuration to the server.
Before, we need to check our running configuration.
netizzan#show running-config
Building configuration...

Current configuration : 718 bytes
!
version 16.6.4
no service timestamps log datetime msec
no service timestamps debug datetime msec
no service password-encryption
!
hostname netizzan
!
!
!
!
!
!
!
!
ip cef
no ipv6 cef
!
!
!
!
!
!
!
!
!
!
!
!
spanning-tree mode pvst
!
!
!
!
!
!
interface GigabitEthernet0/0/0
 description "This interface is connected to the server"
 ip address 192.168.1.1 255.255.255.0
 duplex auto
 speed auto
!
interface GigabitEthernet0/0/1
 no ip address
 duplex auto
 speed auto
 shutdown
!
interface GigabitEthernet0/0/2
 no ip address
 duplex auto
 speed auto
 shutdown
!
interface Vlan1
 no ip address
 shutdown
!
ip classless
!
ip flow-export version 9
!
!
!
!
!
!
!
line con 0
!
line aux 0
!
line vty 0 4
 login
!
!
!
end
Now, we can backup the running config to the TFTP server by entering the following commands;
netizzan#Copy running-config tftp:
Address or name of remote host []? 192.168.1.2
Destination filename [netizzan-confg]?
Writing running-config....!!
[OK - 718 bytes]
718 bytes copied in 3.252 secs (220 bytes/sec)
Note: We first entered the command “Copy running-config tftp:” and clicked “enter,” and it asked us for the destination IP address of the TFTP server. We then provided the IP address, and it asked us for our preferred destination filename. We accepted the default; “netizzan-confg”.
Step 4: Verify the backup
You can verify that the above configuration has been backed up to the TFTP server by going to Services>TFTP.
Step 5: Download the backup configuration
Now, we will remove the connection between router1 and the TFTP server and connect the TFTP server to the Router2.
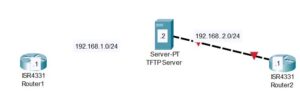
Note: I have changed the interface IP address of the TFTP server from 192.168.1.2 to 192.168.2.2 and the default gateway from 192.168.1.1 to 192.168.2.1.
Before we can download the running conf from the TFTP server to Router2, we need to assign an IP address to the interface of the router connecting to the server.
Router>enable
Router#configure terminal
Router(config)#interface g0/0/0
Router(config-if)#ip address 192.168.2.1 255.255.255.0
Router(config-if)#no shutdown
Note: We did not change the hostname; but after loading the “netizzan-confg” from the TFTP server, router2 will have a hostname as we configured in Router 1.
Router#copy tftp: running-config
Address or name of remote host []? 192.168.2.2
Source filename []? netizzan-confg
Destination filename [running-config]?

Accessing tftp://192.168.2.2/netizzan-confg....
Loading netizzan-confg from 192.168.2.2: !
[OK - 718 bytes]

718 bytes copied in 3.025 secs (237 bytes/sec)
netizzan#
%SYS-5-CONFIG_I: Configured from console by console
netizzan#
As shown above, we first entered the command “copy tftp: running-config,” and it asked us for the address of the server, which is 192.168.2.2. It also asked for the name of the source file, which is “netizzan-confg,” and finally, it asked for the “Destination filename,” for which it chose “running-config,” which is the default.
As you can see in the last line, the hostname has been changed to “netizzan,” which is what we backed up on the TFTP server. You can check the running config by using the command “show running-config”.
Related Post
- How to Configure NTP Server in Packet Tracer
- How to Configure Syslog Server in Packet Tracer
- How to Configure a Web Server in Packet Tracer
- How To Configure FTP Server in Cisco Packet tracer
- How To Configure Email Server in Cisco Packet Tracer
- How to Configure DNS Server On Cisco Packet Tracer

I am a passionate Networking Associate specializing in Telecommunications.
With a degree in Electronic engineering, I possess a strong understanding of electronic systems and the intricacies of telecommunications networks. I gained practical experience and valuable insights working for a prominent telecommunications company.
Additionally, I hold certifications in networking, which have solidified my expertise in network architecture, protocols, and optimization.
Through my writing skills, I aim to provide accurate and valuable knowledge in the networking field.
Connect with me on social media using the links below for more insights.
You can contact me using [email protected] or connect with me using any of the social media account linked below