Whenever we advertise networks on a router in the OSPF configuration mode, the OSPF route advertisement will be enabled on all the interfaces of the router. However, it is good practice to disable the advertisement on interfaces connecting to networks that are not part of the autonomous system or interfaces that are idle.
Disabling the advertisement will help to reduce the amount of OSPF traffic and improve performance, as well as provide additional security by preventing external networks from learning about internal networks.
In this post, I will show how to configure the OSPF passive interface on a Cisco router.
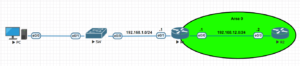
Network Topology
The network topology we will make use of in this post is shown below. As you can see, it consists of two routers, a switch, and a PC. In this demonstration, we will configure OSPF passive interface on the e0/1 interface of R1.

How to configure OSPF Passive Interface on Cisco Router.
To configure the OSPF Passive Interface on a Cisco Router, enter the “passive-interface ethernet0/1” command in the OSPF configuration mode of the router. “ethernet0/1” is the specific interface where you want to disable OSPF route advertisements.
Here is a full configuration step to configure the OSPF passive interface on the e0/1 interface of R1 in the network topology above.

Step 1: Configure the interface of the routers
Router 1
R1(config)#interface ethernet0/0
R1(config-if)#ip address 192.168.12.1 255.255.255.0
R1(config-if)#no shutdown
R1(config-if)#exit

R1(config)#interface ethernet0/1
R1(config-if)#ip address 192.168.1.1 255.255.255.0
R1(config-if)#no shutdown
R1(config-if)#exit
Router 2
R2(config)#interface ethernet0/0
R2(config-if)#ip address 192.168.12.2 255.255.255.0
R2(config-if)#no shutdown
R2(config-if)#exit
Step 2: Configure OSPF on the routers.
After configuring the IP address to the interfaces of the router, we need to configure OSPF to the routers before configuring the OSPF passive interface to e0/1 of Router 1.
Router 1
R1(config)#router ospf 1
R1(config-router)#router-id 1.1.1.1
R1(config-router)#network 192.168.12.0 0.0.0.255 area 0
R1(config-router)#network 192.168.1.0 0.0.0.255 area 0
Router 2
R2(config)#router ospf 1
R2(config-router)#router-id 2.2.2.2
R2(config-router)#network 192.168.12.0 0.0.0.255 area 0
R2(config-router)#exit
Step 3: Configure the OSPF Passive Interface on Router 1
To disable OSPF route advertisement on the e0/1 interface of Router, enter the following commands:.
R1(config)#router ospf 1
R1(config-router)#passive-interface ethernet0/1	<-- Passive Interface ethernet0/1 (LAN Interface)
R1(config-router)#exit
Step 4: Test the configuration
R1#debug ip ospf hello

OSPF hello debugging is on
R1#
*Dec 26 02:57:25.524: OSPF-1 HELLO Et0/0: Send hello to 224.0.0.5 area 0 from 192.168.12.1
R1#
*Dec 26 02:57:26.838: OSPF-1 HELLO Et0/0: Rcv hello from 2.2.2.2 area 0 192.168.12.2
R1#
*Dec 26 02:57:34.963: OSPF-1 HELLO Et0/0: Send hello to 224.0.0.5 area 0 from 192.168.12.1
R1#
*Dec 26 02:57:36.565: OSPF-1 HELLO Et0/0: Rcv hello from 2.2.2.2 area 0 192.168.12.2
R1#
*Dec 26 02:57:44.320: OSPF-1 HELLO Et0/0: Send hello to 224.0.0.5 area 0 from 192.168.12.1
R1#
*Dec 26 02:57:45.931: OSPF-1 HELLO Et0/0: Rcv hello from 2.2.2.2 area 0 192.168.12.2

R1#undebug all
All possible debugging has been turned off
Related Content;
- How to Configure OSPF Default Route on a Cisco Router
- How to Configure OSPF DR and BDR
- Configuring OSPF Hello Timer
- How to Configure OSPF Backbone Area | How to Configure OSPF Area 0
- How to Configure OSPF Multi-Area
- How To Configure OSPF on Layer 3 Switch In Packet Tracer
- Redistributing Static Routes into OSPF: Explained With Example

I am a passionate Networking Associate specializing in Telecommunications.

With a degree in Electronic engineering, I possess a strong understanding of electronic systems and the intricacies of telecommunications networks. I gained practical experience and valuable insights working for a prominent telecommunications company.
Additionally, I hold certifications in networking, which have solidified my expertise in network architecture, protocols, and optimization.
Through my writing skills, I aim to provide accurate and valuable knowledge in the networking field.
Connect with me on social media using the links below for more insights.
You can contact me using [email protected] or connect with me using any of the social media account linked below