In any network, a default route serves as a fallback option for routers to forward traffic if there is no specific path to the destination of the traffic in the routing table.
When a router receives a packet, it searches its routing table for a route to the destination. If a route exists, the router forwards the traffic through the shortest available path. However, if no route is found, the router resorts to the default route. If there’s neither a specific route nor a default route configured, the router discards the traffic.
Typically, the default route points towards the internet since routers cannot have routes to every possible destination in the internet. Therefore, any traffic without a matching route in the routing table is presumed to be destined for the internet and is forwarded accordingly using the default route.
In networks employing static routes, configuring a default route involves using the “ip route 0.0.0.0 0.0.0.0 next-hop address” command from the router’s privileged exec mode. However, with OSPF and other dynamic routing protocols, the “default-information originate” command facilitates the injection of default routes into the routing protocol, enabling their propagation throughout the network.

In this post, I will demonstrate how to configure an OSPF default route using a sample network.
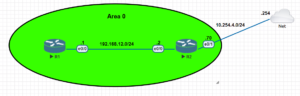
Network Topology
Our network consists of two routers, R1 and R2. R1 is directly connected to R2 via Ethernet interfaces. We’ll configure default route on R2, which will then be propagated to R1.

How to Configure OSPF Default Route on a Cisco Router
Here are the steps to configure OSPF default route for the network shown above:
Step 1: Configure The interfaces of the Routers
Router 1
R1(config)#interface ethernet0/0
R1(config-if)#ip address 192.168.12.1 255.255.255.0
R1(config-if)#no shutdown
R1(config-if)#exit
Router 2
R2(config)#interface ethernet0/0
R2(config-if)#ip address 192.168.12.2 255.255.255.0
R2(config-if)#no shutdown
R2(config-if)#exit

R2(config)#interface ethernet0/1
R2(config-if)#ip address 10.254.4.70 255.255.255.0
R2(config-if)#no shutdown
R2(config-if)#exit
Step 2: Configure static default route
Because it is router 2 that has a connection to the internet, we will configure the default route on it.

R2(config)#ip route 0.0.0.0 0.0.0.0 10.254.4.254
Step 3: Configure OSPF on the routers
Router 1
R1(config)#router ospf 1
R1(config-router)#router-id 1.1.1.1
R1(config-router)#network 192.168.12.0 0.0.0.255 area 0
R1(config-router)#exit
Router 2
R2(config)#router ospf 1
R2(config-router)#router-id 2.2.2.2
R2(config-router)#network 192.168.12.0 0.0.0.255 area 0
R2(config-router)#exit
Step 4: Configure OSPF Default route
After configuring the static route as we did in step 2, the default route does not propagate to all other OSPF routers. To enable this, we need to use the “default-information originate” command on the router for which the static default route is configured.
R2(config)#router ospf 1
R2(config-router)#default-information originate always
R2(config-router)#exit
Step 5: Verify the Configuration
You can verify that the default route has been created by using the “show ip route command” as follow;
R1#show ip route
Codes: L - local, C - connected, S - static, R - RIP, M - mobile, B - BGP
       D - EIGRP, EX - EIGRP external, O - OSPF, IA - OSPF inter area
       N1 - OSPF NSSA external type 1, N2 - OSPF NSSA external type 2
       E1 - OSPF external type 1, E2 - OSPF external type 2
       i - IS-IS, su - IS-IS summary, L1 - IS-IS level-1, L2 - IS-IS level-2
       ia - IS-IS inter area, * - candidate default, U - per-user static route
       o - ODR, P - periodic downloaded static route, H - NHRP, l - LISP
       a - application route
       + - replicated route, % - next hop override, p - overrides from PfR

Gateway of last resort is 192.168.12.2 to network 0.0.0.0

O*E2  0.0.0.0/0 [110/1] via 192.168.12.2, 00:01:27, Ethernet0/0<--OSPF Default Route
      192.168.12.0/24 is variably subnetted, 2 subnets, 2 masks
C        192.168.12.0/24 is directly connected, Ethernet0/0
L        192.168.12.1/32 is directly connected, Ethernet0/0
Related Content;
- Configuring OSPF Hello Timer
- How to Configure OSPF DR and BDR
- How to Configure OSPF Passive Interface on Cisco Router
- How to Configure OSPF Backbone Area | How to Configure OSPF Area 0
- How to Configure OSPF Multi-Area
- How To Configure OSPF on Layer 3 Switch In Packet Tracer
- Redistributing Static Routes into OSPF: Explained With Example
Reference: https://github.com/misterkrittin/CCNA-Labs

I am a passionate Networking Associate specializing in Telecommunications.
With a degree in Electronic engineering, I possess a strong understanding of electronic systems and the intricacies of telecommunications networks. I gained practical experience and valuable insights working for a prominent telecommunications company.
Additionally, I hold certifications in networking, which have solidified my expertise in network architecture, protocols, and optimization.
Through my writing skills, I aim to provide accurate and valuable knowledge in the networking field.
Connect with me on social media using the links below for more insights.
You can contact me using [email protected] or connect with me using any of the social media account linked below