File Transfer Protocol (FTP) is a protocol employed for the efficient transfer of files between a client and a server within a computer network. In our daily routines, we regularly encounter applications utilizing this protocol, like in web development.
During the development of a website, the web developer creates and modifies various files, such as HTML, CSS, JavaScript, and image files, on their local computer.
Once the development work is completed or a significant update is made, the developer uses an FTP client (software like FileZilla, Cyberduck, etc.) to connect to the web server. They then transfer (upload) the updated files from their local machine to the server.
In packet tracer simulation software, one can simulate a network that allows an FTP client to engage in actions such as creating, renaming, deleting, or downloading files from a designated file server.

In this post, I will show you how to configure the FTP server in the packet tracer so that the FTP client can connect and manage the files.
Related Post
- How to Configure NTP Server in Packet Tracer
- How to Configure Syslog Server in Packet Tracer
- How to Configure a Web Server in Packet Tracer
- How to Configure TFTP Server In Packet Tracer
- How To Configure Email Server in Cisco Packet Tracer
- How to Configure DNS Server On Cisco Packet Tracer
Network Topology
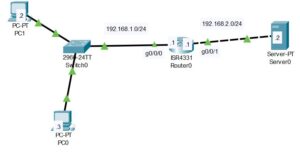
The network topology that we will be making use of is shown in the picture below. As you can see, it comprises a server, which we will use as our file server, two PCs, which we will use as two FTP clients, a router, and a switch.

In this demonstration, we will create an FTP user on the server, create a file on one of the PCs, upload the file from the PC to the server, and then download the file on another PC using the file transfer protocol.
Here is a video on how to configure FTP server;

How To Configure FTP Server in Cisco Packet tracer
Here are steps to configure an FTP server in cisco packet tracer;
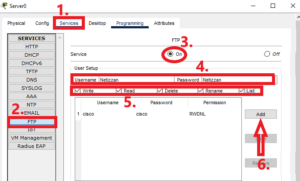
Step 1: Add FTP User
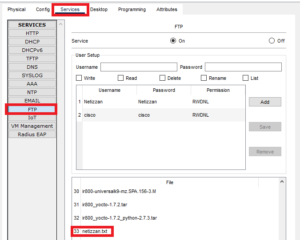
The first step is to add users to the FTP server. Go to Services>FTP and then enter the username and password for the FTP user. Select the permissions you want to give the user to the server, and then click on Add.
Step 2: Configure the router
Enter the following commands to configure the interfaces of the router;
Router>enable
Router#configure terminal
Router(config)#hostname R1
R1(config)#interface g0/0/1
R1(config-if)#ip address 192.168.2.1 255.255.255.0
R1(config-if)#no shut
R1(config-if)#interface g0/0/0
R1(config-if)#ip address 192.168.1.1 255.255.255.0
R1(config-if)#no shut
Note: You need to complete the IP address configuration on the two PCs and the server.
Step 3: Sign in to Server from the FTP Client
In the above step, we created an FTP user with a username (Netizzan) and a password (Netizzan). To sign in to the FTP server from the PC. Navigate to the Command prompt on the PC and then enter the following command:
C:\>ftp 192.168.2.2You will be asked to provide the username and the password. In the FTP account we created on step 1, username is Netizzan and password is Netizzan.
Note: the IP address; 192.168.2.2 is the IP address of the FTP server.

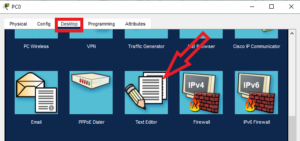
Step 4: Create a Text File
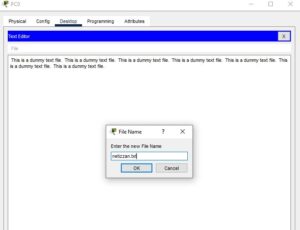
Now that we have signed in to the FTP account on the server, We can create a file on the Client machine and then upload it to the server. Go to Desktop>Text Editor
Then add some dummy text and then save it by clicking on the “X” button and selecting save.
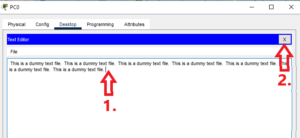
You will be prompted to give the file a name. I gave mine the name; netizzan.txt
Step 5: Upload the File to the FTP server
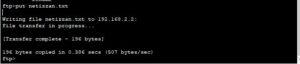
Go back to the Command prompt of the FTP Client (PC0) and upload the file we just created to the FTP server. If you are still signed in to the FTP account, you can upload the file using the following command:
ftp>put netizzan.txtIf you have been signed out, sign in using the command we showed in step 3.
You can verify that the text file has been uploaded to the server by going to services>FTP.
Step 6: Download the file from the FTP server
Now that we have confirmed that the file is existing on the FTP server, we can download it on the second PC(PC1) by signing in into the FTP server account on PC1 and using the command below;
ftp>get netizzan.txt
There are many other operations you can do on the FTP server using the FTP client. You can delete, rename, or change a directory within the CLI of the FTP client.
When you type “?” on the CLI and click the “enter key,” you will be provided with a list of commands you can run with the FTP client.

FTP Commands and their function
- cd (Change Directory): Changes the current working directory on the remote FTP server. For example,
cd HTTPwould navigate to the “HTTP” directory. - delete: Deletes a file on the remote FTP server. For instance,
deleting myfile.txtwould remove the file named “myfile.txt” from the server. - dir (Directory Listing): Displays a list of files and directories in the current working directory on the remote FTP server. This command provides a directory listing similar to the
lscommand in Unix/Linux. - get: Downloads a file from the remote FTP server to the local machine. For instance,
get file.txtwould download the file named “file.txt” from the server. - help: displays information about FTP commands. Typing
helpor thehelp commandprovides information on the usage of the specified command. - passive: toggles between passive and active modes for data transfers. Passive mode is often used when the client is behind a firewall, allowing it to initiate data connections to the server.
- put: uploads a file from the local machine to the remote FTP server. For example,
put localfile.txtwould upload the file named “localfile.txt” to the server. - pwd (Print Working Directory): Displays the current working directory on the remote FTP server. It shows the path to the directory where the user is currently located.
- quit: Closes the connection to the FTP server and terminates the FTP session. This command is used to gracefully exit the FTP client.
- rename: renames a file on the remote FTP server. For instance,
rename oldfile.txt. newfile.txtwould rename the file “oldfile.txt” to “newfile.txt” on the server.
Related Post
- How to Configure NTP Server in Packet Tracer
- How to Configure Syslog Server in Packet Tracer
- How to Configure a Web Server in Packet Tracer
- How to Configure TFTP Server In Packet Tracer
- How To Configure Email Server in Cisco Packet Tracer
- How to Configure DNS Server On Cisco Packet Tracer

I am a passionate Networking Associate specializing in Telecommunications.
With a degree in Electronic engineering, I possess a strong understanding of electronic systems and the intricacies of telecommunications networks. I gained practical experience and valuable insights working for a prominent telecommunications company.
Additionally, I hold certifications in networking, which have solidified my expertise in network architecture, protocols, and optimization.
Through my writing skills, I aim to provide accurate and valuable knowledge in the networking field.
Connect with me on social media using the links below for more insights.
You can contact me using [email protected] or connect with me using any of the social media account linked below