Email is an integral part of our daily communication. It helps exchange messages seamlessly.
When we send an email, the message traverses through an email server before reaching its intended destination. A perfect example of an email server is SMTP, which is used by Google for its email services.
In Cisco Packet Tracer, one can simulate the communication flow of emails between two email clients. This simulation involves registering the two users on the email server and configuring the email clients to interact with the server, allowing for the forwarding of messages and replies.
In this post, I will show you How To Configure Email Server in Cisco Packet Tracer.

Related Post
- How to Configure NTP Server in Packet Tracer
- How to Configure Syslog Server in Packet Tracer
- How to Configure a Web Server in Packet Tracer
- How to Configure TFTP Server In Packet Tracer
- How To Configure FTP Server in Cisco Packet tracer
- How to Configure DNS Server On Cisco Packet Tracer
Network Topology
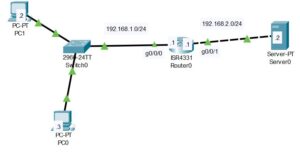
The network topology we will be making use of is shown below. As you can see, it comprises of two PCs(which will serve as email client), a server (which will be our email server), a router and a switch. Create this network topology observing the IP address labels.

Here is a video on how to configure Email server in packet tracer
How To Configure Email Server in Cisco Packet Tracer
Here are steps to configure Email server in cisco packet tracer;
Step 1: Configure the Domain Name
Any email server will need a domain name. For instance, Google runs its email services on the domain Gmail.com.

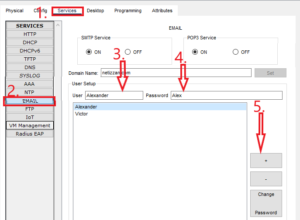
To set a domain for the Email server, Navigate to Services>Email, and you will see the option to set the domain name of the email server. In this demonstration, I will set the domain to be netizzan.com.

Step 2: Add User to the Server
For any email client to be able to send or receive requests from the server, it must be added as a user of the services. This is equivalent to the process of creating a Google account. To add a user; you just need a username and password.
In this case that the domain name is netizzan.com. Any user added will be available at the email address [email protected].
For instance, in the image below, we have added a user with the username “Alexander,” and this user can be reached by other clients using the address [email protected]. We have also added a second user with the username Victor which can be reached as well on [email protected].
Remember to add a second user with details: username Victor and password Victor.
Step 3: Configure the router
Enter the following commands to configure the interfaces of the router;
Router>enable
Router#configure terminal
Router(config)#hostname R1
R1(config)#interface g0/0/1
R1(config-if)#ip address 192.168.2.1 255.255.255.0
R1(config-if)#no shut
R1(config-if)#interface g0/0/0
R1(config-if)#ip address 192.168.1.1 255.255.255.0
R1(config-if)#no shut
Step 4: Configure the Email Client
Now that we have added a user to the email server, we need to set up the email client. This step is similar to the process of signing into your Google account on your Gmail app.
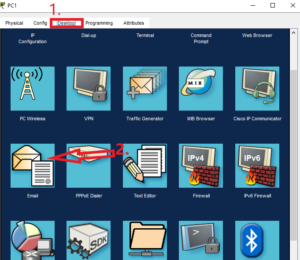
Navigate to Desktop>Email on one of the PCs.
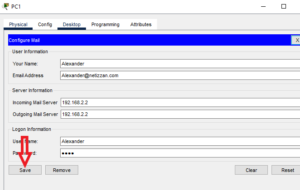
Then select “configure mail”;
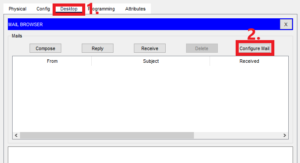
Then enter the required information, which includes the username, email address, server information, and password.
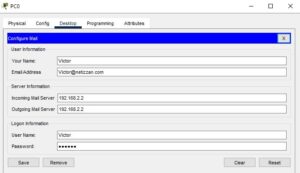
Go to the second PC and configure it as well.
Step 5: Test Configuration
Now that we have configured both PC0 and PC1 as email clients, we can test the configuration by sending an email from PC0 to PC1.
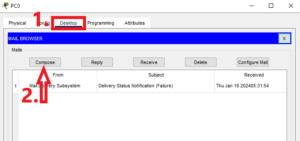
Then compose an email by entering the recipient’s address, subject, and body, and then click on send.

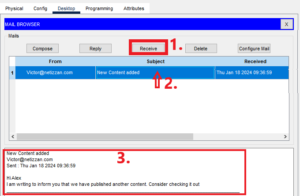
Then go to the second email client (PC1) and confirm that the email has been received.
Related Post
- How to Configure NTP Server in Packet Tracer
- How to Configure Syslog Server in Packet Tracer
- How to Configure a Web Server in Packet Tracer
- How to Configure TFTP Server In Packet Tracer
- How To Configure FTP Server in Cisco Packet tracer
- How to Configure DNS Server On Cisco Packet Tracer

I am a passionate Networking Associate specializing in Telecommunications.
With a degree in Electronic engineering, I possess a strong understanding of electronic systems and the intricacies of telecommunications networks. I gained practical experience and valuable insights working for a prominent telecommunications company.
Additionally, I hold certifications in networking, which have solidified my expertise in network architecture, protocols, and optimization.
Through my writing skills, I aim to provide accurate and valuable knowledge in the networking field.
Connect with me on social media using the links below for more insights.
You can contact me using [email protected] or connect with me using any of the social media account linked below