For a host to obtain an IP address from a DHCP server, it sends a DHCP request to the DHCP server on the network, and the server will reply by leasing out an IP address from the pool of available addresses to the host. DHCP clients connected to a switch are expected to transmit only DHCP DISCOVER and DHCP REQUEST messages. However, hackers connecting to the switch may attempt to transmit DHCPOFFER and DHCPACK messages, which should only come from a legitimate DHCP server. If this is not mitigated, they can exploit this vulnerability to launch DHCP-based denial-of-service attacks the network.
To protect the hosts within the organization’s network and to prevent unauthorized rogue DHCP servers from establishing connections, it is crucial to configure DHCP snooping on the Layer 2 switch where the unauthorized hosts are connected.
DHCP Snooping is a security technology implemented on a Layer 2 network switch, designed to prevent unauthorized DHCP servers from accessing your network. It serves as protection against untrusted hosts attempting to impersonate DHCP servers. While DHCP operates on Layer 3 of the OSI model, DHCP snooping operates on Layer 2 devices, filtering traffic originating from DHCP clients.
In Cisco switches, DHCP snooping is not enabled by default. To activate DHCP Snooping on a Cisco switch, trusted ports must be manually configured, while the remaining unconfigured ports are considered untrusted. Typically, devices such as routers, switches, and servers are connected to trusted ports, whereas DHCP clients like PCs and laptops are commonly connected to untrusted ports.

After configuring the trusted ports, the switch will permit DHCP server messages such as DHCPOFFER and DHCPACK that originate from trusted sources. Any such messages received from untrusted ports will prompt the switch to discard the DHCP traffic, thus enhancing network security and integrity.
In this post, I will show you how to configure DHCP Snooping in Cisco Packet Tracer using a sample network topology.

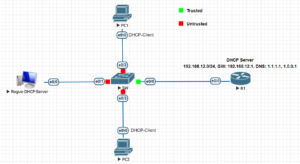
Network Topology
The network topology we will be making use of in this post is shown below. As you can see, it consists of a switch, two PCs, a rogue DHCP server, and a Cisco router, which will serve as the trusted DHCP server. In this demonstration, we will configure DHCP snooping by configuring only the switchport connecting to the router as a trusted port and then every other port to be untrusted.
How to Configure DHCP Snooping in Cisco Switch
Here are steps to configure DHCP snooping in a Cisco switch using the network topology shown above as a case study.

Step 1: Configure Interface of the DHCP server
As shown in our network topology, our DHCP server is the router. So, we will first configure the router’s interfaces by using the commands below:
R1(config)#interface ethernet0/0
R1(config-if)#ip address 192.168.12.1 255.255.255.0
R1(config-if)#no shutdown
R1(config-if)#exit
Step 2: Configure the DHCP Server
To configure Router as a DHCP server, we need to create a DHCP pool and then specify the DNS server, the default gateway address, and then the domain name.
R1(config)#ip dhcp pool LAN
R1(dhcp-config)#network 192.168.12.0 /24
R1(dhcp-config)#dns-server 1.1.1.1 1.0.0.1
R1(dhcp-config)#default-router 192.168.12.1
R1(dhcp-config)#domain-name cisco.lab
R1(dhcp-config)#exit
Step 3: Configure DHCP Snooping
Enter the following commands on the Cisco switch to configure DHCP snooping:
SW(config)#ip dhcp snooping
SW(config)#interface ethernet0/0
SW(config-if)#ip dhcp snooping trust
SW(config-if)#exit

SW(config)#interface range ethernet0/1-3
SW(config-if-range)#ip dhcp snooping limit rate 10
SW(config-if-range)#end
Here is a brief explanation of the commands above;
SW(config)#ip dhcp snooping: This command is used to enable DHCP snooping globally on a Cisco switch. When entered in the global configuration mode (config), it activates DHCP snooping functionality throughout the switch, allowing the switch to filter DHCP traffic and maintain a DHCP snooping database.SW(config-if)#ip dhcp snooping trust: This command is used within the interface configuration mode (config-if) to designate a specific interface as trusted for DHCP traffic (ethernet0/0 in this case). When applied to an interface, it tells the switch that DHCP server messages received on this interface can be trusted.SW(config-if-range)#ip dhcp snooping limit rate 10: This command sets a rate limit on DHCP messages for the specified range of interfaces. In this case, it limits the rate of DHCP messages to 10 messages per second. This can help prevent DHCP-based denial-of-service attacks by restricting the number of DHCP messages allowed within a certain time frame.
Step 3: Verify DHCP Snooping configuration
You can verify that DHCP snooping was configured properly by using the following show command.
SW#show ip dhcp snooping

Switch DHCP snooping is enabled
DHCP snooping is configured on following VLANs:
none
DHCP snooping is operational on following VLANs:
none
DHCP snooping is configured on the following L3 Interfaces:

Insertion of option 82 is enabled
   circuit-id default format: vlan-mod-port
   remote-id: aabb.cc00.2a00 (MAC)
Option 82 on untrusted port is not allowed
Verification of hwaddr field is enabled
Verification of giaddr field is enabled
DHCP snooping trust/rate is configured on the following Interfaces:

Interface                  Trusted    Allow option    Rate limit (pps)
-----------------------    -------    ------------    ----------------
Ethernet0/0                yes        yes             unlimited
  Custom circuit-ids:
Ethernet0/1                no         no              10
  Custom circuit-ids:
Ethernet0/2                no         no              10
  Custom circuit-ids:
Ethernet0/3                no         no              10
  Custom circuit-ids:
Related content;
How to Configure DHCP Server For Multiple VLANS in Packet Tracer
DHCPv4 Server & DHCPv4 Client Configuration on Cisco Router
How to Configure DHCP on Layer 2 Switch in Packet Tracer
How to Configure DHCP Relay Agent on Layer 3 Switch
How to Configure DHCP on Layer 3 Switch In Packet Tracer

I am a passionate Networking Associate specializing in Telecommunications.
With a degree in Electronic engineering, I possess a strong understanding of electronic systems and the intricacies of telecommunications networks. I gained practical experience and valuable insights working for a prominent telecommunications company.
Additionally, I hold certifications in networking, which have solidified my expertise in network architecture, protocols, and optimization.
Through my writing skills, I aim to provide accurate and valuable knowledge in the networking field.
Connect with me on social media using the links below for more insights.
You can contact me using [email protected] or connect with me using any of the social media account linked below