Cisco routers can function both as DNS servers and as DNS clients. A DNS server plays an important role in mapping the IP addresses of host devices to their corresponding hostnames.
On the other hand, a DNS client is a network device capable of reaching other hosts on the network using their hostnames, not just with their IP addresses.
Before a host device can reach another host with a hostname, the destination host must be added to the DNS record of the DNS server.
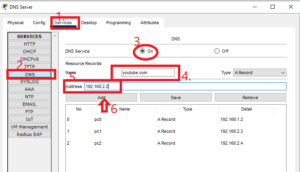

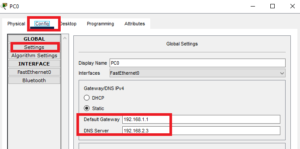
Then the IP address of the DNS server needs to be configured as the DNS server of the source host.

In this post, I will show you how to use a Cisco router as a DNS client.
Here is a video on how to configure a Cisco router as DNS Client;
Network Topology
The network topology we will be using in this post is shown below. In this demonstration, we will be configuring the Cisco router as a DNS client for the DNS server.

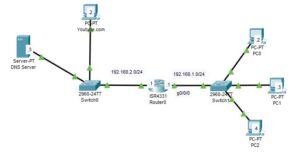
Note: We have shown how to configure the DNS server in a separate post; How to Configure DNS Server On Cisco Packet Tracer
How to configure Cisco Router as DNS Client
Here are the two steps to configure a Cisco router as a DNS client and verify the configuration:
Step 1: Configure the Name-server
Enter the following command to configure the name server for the DNS client(router);
R0>enable
R0#configure terminal
R0(config)#ip name-server 192.168.2.3
The commands above enter the global configuration mode of the router and set the name-server IP to 192.168.2.3, which is the IP address of the DNS server.
Step 2: Verify the configuration
Verify that the Cisco router is now acting as a DNS client by pinging a host by its host name from the privilege exec mode of the router.


I am a passionate Networking Associate specializing in Telecommunications.
With a degree in Electronic engineering, I possess a strong understanding of electronic systems and the intricacies of telecommunications networks. I gained practical experience and valuable insights working for a prominent telecommunications company.
Additionally, I hold certifications in networking, which have solidified my expertise in network architecture, protocols, and optimization.
Through my writing skills, I aim to provide accurate and valuable knowledge in the networking field.
Connect with me on social media using the links below for more insights.
You can contact me using [email protected] or connect with me using any of the social media account linked below